Few of the articles are posted as Images, Please use Laptop / Computers to go through the articles for best experience. For phone users, switch to Web Version

Please Share with your colleagues if you found these blogs informative. Happy Learning :-)

Registering VM via Command Line


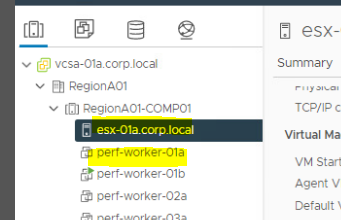
VM is perf-worker-01a & 
Esxi is esx-01a.corp.local


Steps
 Navigate to the Esx host & enable SSH.
To enable SSH, Click on Esx --> Configure --> Services --> SSH & Start the service.


Open Putty & connect the Esx.


We will first inode of the datastore where VM is present. To do it use below command,
     find -iname VMNAME


Copy the output & traverse to it using below command.
Cd Ouputof first command


Use below command to register the VM.

Vim-cmd solo/registervm /vmfs/volumes/5a905bc6-8f09ccc8-9e77-00505601dfda/perf-worker-01a/perf-worker-01a.vmx


Validate the results from Host & Cluster View.


Resetting Windows Local Admin Password Using Utilman.exe Utility

Requirements
ISO of Windows Setup. Prefer same OS ISO if possible.


Steps
1. We will first mount the ISO to the Physical / Virtual Machine & boot the VM from it. 

Mounting ISO


Open Boot Menu by Pressing F10,F11 ( Depends on the machine you are using).
Select CD ROM Drive & machine will start loading the Setup.


Press Shift + F10  when you see below screen. This will open command prompt.


We need to edit some files in System32 under Windows folder, so first step should be to detect the  drive where OS is installed.

Use Diskpart & then list volume. This will list all the Volumes currently present on the System.

Note C volume is of 350 MB, so OS can't be present on it. 


Let's traverse to D drive to see what files & folders are present on it. To do this, we first need to exit Diskpart.
Switching to D Volume by typing D:\

To view the content of D volume type dir.
Folders such as Windows, Users , Programs files etc clearly indicates D volume is OS drive.


We will first traverse to System32 folder using below command.

Cd .\Windows\System32

We will then rename utilman.exe to some other name. Here I have renamed Utilman.exe to Utilman.exe.Old


Once Utilman.exe is renamed, we will then copy cmd.exe Utilman.exe


We will then exit the setup and continue to boot the VM normally. Make sure you are not booting the System from CD drive.

Once Welcome screen comes, we will click on below highlighted Icon to trigger Utilman.exe. ( Note - Since we have copy cmd.exe as utilman.exe, hence once we click on the Icon, it will open command prompt).


Type net user command to view all the local account configured on the VM.
Below screenshot show Administrator as the Only Local account & we will be resetting password for it.

To reset type net user "Account Name" * & hit enter. It will then ask us for new password. Proceed with typing the new password & confirm the same. Once done hit enter & the password will be set.

Note - Password typed while resetting won't be visible, so make sure password matches while resetting.


We can then login to the machine & verify the same.


Mounting Disk of One VM to Another VM

 I ran into a Problem where one of VM crashed & hence unable to boot it. I had important data in one of the disk attached to the VM.


To recover data, we can mount the disk to some other VM & then can recover our data. To implement follow below steps -

1. Note down the Disk holding your data along with the datastore name. You can easily get this info by right clicking on the VM & Edit Settings.


2. We first need to remove the disk attached to the affected VM. Click on "X" icon to remove it. ( Don't check mark delete from Datastore also option)


3. One removed, we can navigate to other Working VM , Right click --> Edit Settings --> Add Hard drive & here select existing Hard disk Option.


4. Navigate to the datastore containing the disk. ( This was noted in Step 1)


5. Login to the VM. Navigate to Disk management & mark the newly disk as Online.


Able to see all the data now.


Disk Modes - Dependent Vs Independent

 We have two type of disk modes - Dependent & Independent modes.

Further independent disk modes has two flavors which are Independent Persistent & Independent Non Persistent modes.


Difference between them comes into the picture when we talk about Snapshot.

Dependent Disk - By default every newly created Hard drive/disk is Dependent disk. So assume if you have a VM which is having dependent disk then after taking snapshot, you will see two .VMDK's one for the base / parent disk & other would be a delta disk.

This means dependent disk are considered in Snapshots. Below highlighted .vmdk is a delta disk created after snapshot. All the changes would be written first to this vmdk & once we decide to delete the snapshot, then all the things from this vmdk will be committed to Parent disk (Non highlighted VMDK)


Independent Disk - Whether it's Persistent or Non Persistent, these type of disk are not considered in Snapshots.

In Independent Persistent mode, once you do any changes on this disk, then it would be permanently written to that disk, so snapshot here doesn't make any sense & that why even if you take a snapshot for a VM, then you won't be seeing snapshot delta disk for the disk which is independent persistent type.

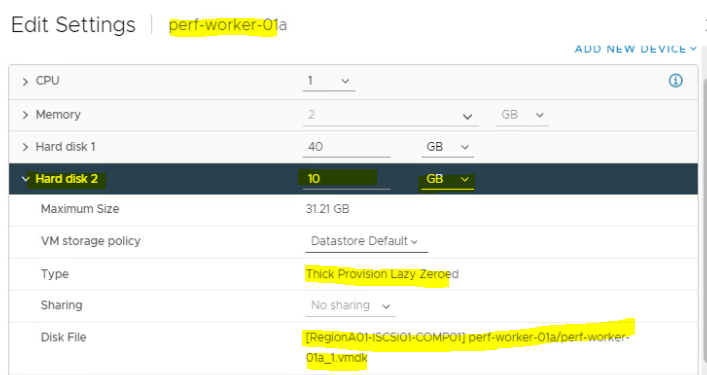
Ex - I have created a disk of 10GIG which is of Independent Persistent mode, and for testing purpose I have taken a snapshot.


Datastore view post adding 10 GIG disk.


Taking Snapshot 


So if we explore the files inside the VM folder in datastore, then we will see only one delta disk which is for first disk as it was Dependent disk. You won't be seeing any delta disk for 2nd disk & the reason being it is independent persistent disk.

In below snap, highlighted disk is a delta disk for disk 1 & no delta disk for disk 2.


Independent Non Persistent - In this mode, once we create a snapshot, then instead of delta disk, some redo logs are created. These are like temporary storage & all the changes that you do on Non Persistent delta disk after taking snapshot will be written to the redo logs.

Since it is temporary, so once you delete the snapshot or even shutdown the VM, all the written changes from the redo logs will be gone.

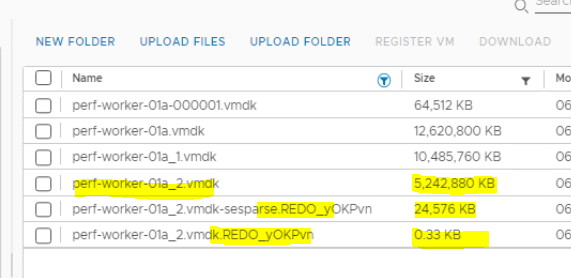
Ex - I have added a New Disk of 5GIG as an Independent Non Persistent mode & then took a snapshot.


Datastore view post creating Non Persistent disk - 

Uploading: 54737 of 54737 bytes uploaded.
Taking Snapshot


Exploring the files inside VM folder, we will be seeing a new Delta disk on the second row created & this is for first disk as it was Dependent mode, whereas we won't see any delta disk for second disk as it was Independent Persistent mode & finally for third disk we don't see any delta disk created but we do see redo logs created on last two rows & this is primarily because the disk mode is Independent Non Persistent.


Finish ..


Fixing Remove Permission Failed Error from Esxi

I mistakenly added a Group named  "Infra VMware Team" in Permissions tab on an Esxi directly.


When trying to  remove it, getting below error - 


Fix - 
This is due to a bug which prevents removing explicit Users or Groups added to Esx Permissions. We can make use of PowerCLi to fix this.


1. We will connect to our Vcenter using PowerCLi, provide correct User ID & Password.


2. Once connected, we can view all the Esx in the Vcenter by typing "Get-VMHost" cmdlet.


3.  Viewing all the permission on esx-02a.corp.local by typing below command - 

Get-VIPermission -Entity Esxhostname | Format-Table  - Autosize


4. We can also use Principal switch as show below to check permission of a specific user or a group.


5.  To remove permission, type below command - 

Get-VIPermission -Entity Esxhost -Principal 'domain\userorgroup'  | Remove-VIPermission -confirm:$false


& we are done. We can cross check it through GUI or through CLI as well. (Repeat command mentioned in step 3)


Finish

Difference in Template & Cloning


People often get confuse in Templates & Cloning Concept. Let's understand the concept using a Scenario - 

Consider today is 1st Jan 2022, and you have deployed a VM named "VM1", configured various settings, Install required basic applications, Patching etc. Now the management has asked you to create 10 more identical VM's ( meaning same configuration , Applications, Patching etc). It would take so much time if you create & configure VM one by one, also there might be good chances of human errors as well.

In order to overcome this, we have two Concepts "Templates" & "Cloning". Both these concept serve similar purpose and that is creating VM's from existing Setup/VM. This saves our time & reduces chances of human errors.

Since both serve same purpose, then why do we have two Concepts ? Why not only one ?

Answer to this is the way these are used & when they are used.

To understand Template, Suppose the VM that we created & configure on Jan1 "VM1" is converted to a state where it can't be powered on. Now that state will act as a template & we can use it to create  new VM's.
So if I have converted VM1 to a template & use it to create new VM's  then no matter when you create New VM's, all will contain consistent settings & configurations.

Cloning - Here you are creating a new VM from a Live VM. So if you create another VM from VM1 on Jan1 itself, then that would ideally contain all the same configuration & settings ( Considering you haven't made any changes to VM1), but let's assume you created another VM from VM1 after 2 months, then the New VM might contain some extra/different settings from other VM's cloned from VM1 & this is simply because of changes made on VM1 in two months.

In Short, Template ensures consistent state & settings on all new VM's deployed from it whereas Cloning ensures identical duplicate copy of an existing/master VM's.


Apart from this, there are few more differences in both these concept's - 

1. You can't create a Template of a VM when it's powered on. You need to Powered off the VM first, whereas in cloning you can create a New VM from a Live running VM.

2. If required any editing on the template, you first need to convert the template back to a VM, do the changes & then convert it back to the template. In Cloning, since the VM is live, you can do the changes on the Live VM & then cloned a new VM out of the existing /parent VM.

Note - Administrators needs to be careful while Cloning a VM because there are good chances of IP conflict when they powered on the cloned VM & this is primarily because you master VM is also online & having same IP configuration.
To avoid, Administrators first uncheck NIC for the Cloned VM, power it on, login via Console,  do the IP, hostname, SID changes & then enable NIC.
 

Powershell Script - Creating New AD Groups

#Author - Abhishek Bansal 

$grp = Get-Content ./Input.txt
foreach($row in $grp){
$row = $row.trim()

    try
    {
    New-ADGroup -Name $row -GroupScope Global -GroupCategory Security -Path "OU=Groups,OU=Production,DC=Mari,DC=com" -PassThru | Select Name,@{n=("Status");e={("Created under")}},DistinguishedName | Export-Csv ./Output.csv -Append -NoTypeInformation
    }

catch
    {
       $row | Select-Object -Property @{n=("Name");e={($row)}},@{n=("Status");e={("already exist under ")}},@{n="DistinguishedName";e={(Get-ADGroup -Identity $row | Select DistinguishedName)}} | Export-Csv ./Output.csv -Append -NoTypeInformation
        }

}


Read Me !!

1. I am using a relative path to take input & export the output. So please make sure you Create a folder with any name of your liking, then copy the above script & save it with .ps1 extension into the folder.

2. Once copied, also create a text file name Input.txt ( This will be used to take input into our Script & it should contain AD Group names which we need to create.


3. Once done, run the script. It will create the new AD Group under OU mentioned in the script.


Please note- Some Arguments are static in the Script, they will definitely vary in your workspace, so  edit them as per your structure.

Arguments required editing - Group Scope / Category [ If you want some other Scope & Category ], Path - [ OU  Location where you want to create the Groups]

4. Also, If a Group is already created, then this script will through an error & for that we have mentioned Catch block. This way you can see which all Groups are created & which are already present, where it is present etc.


Finish