Few of the articles are posted as Images, Please use Laptop / Computers to go through the articles for best experience. For phone users, switch to Web Version

Please Share with your colleagues if you found these blogs informative. Happy Learning :-)

Showing posts with label Windows. Show all posts

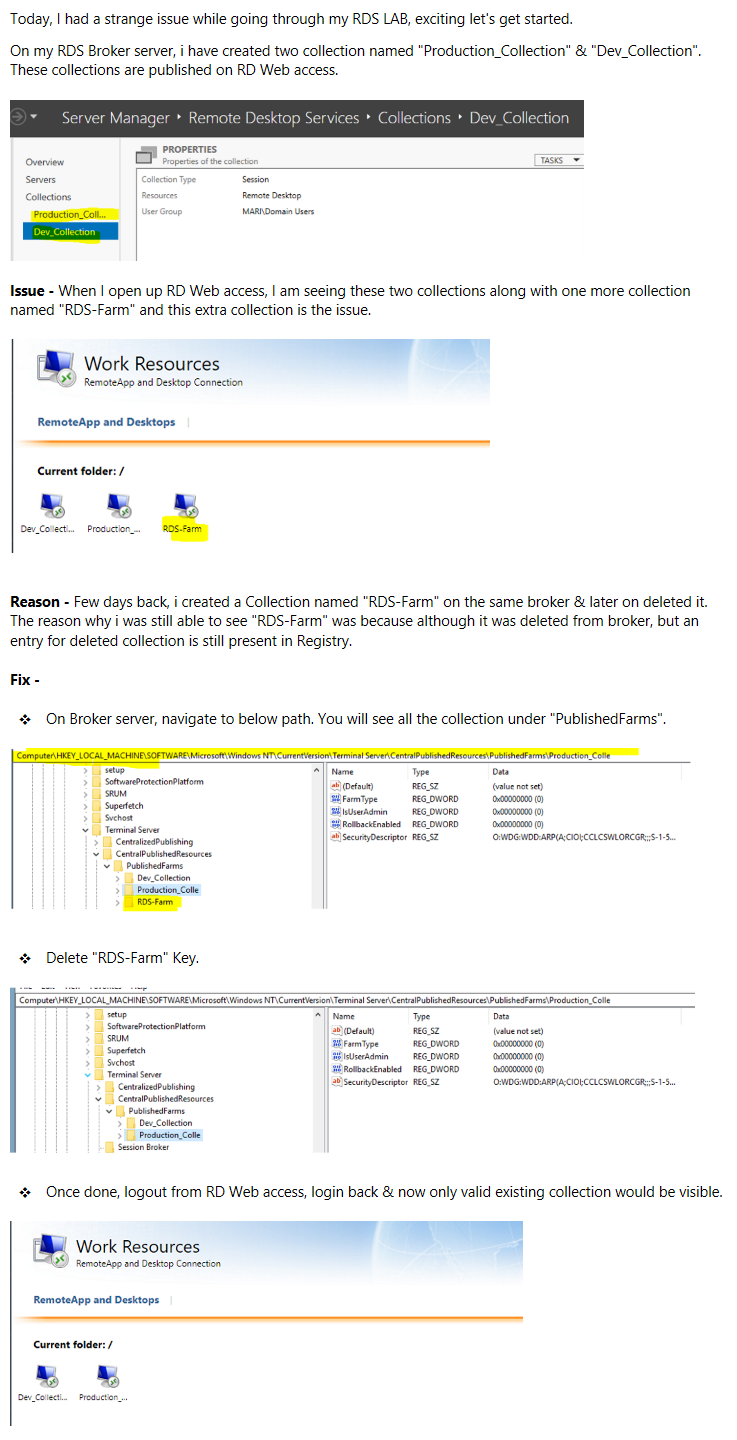
RDS - Removing Invalid Collection from RD Web Access

Today, I had a strange issue while going through my RDS LAB, exciting let's get started.

On my RDS Broker server, i have created two collection named "Production_Collection" & "Dev_Collection". These collections are published on RD Web access.


Issue - When I open up RD Web access, I am seeing these two collections along with one more collection named "RDS-Farm" & this extra collection is the issue.


Reason - Few days back, i created a Collection named "RDS-Farm" on the same broker & later on deleted it. The reason why i was still able to see "RDS-Farm" was because although it was deleted under Remote Desktop Service on Broker, but an entry for deleted collection is still present in Registry on Broker server.

Fix - 

1. Navigate to below path. You will see all the collection under "PublishedFarms".


2. Delete "RDS-Farm" Key.


3. Once done, logout from RD Web access, login back & now only valid existing collection would be visible.


Patch Installation via Command Line

Two Step Process
1. Expand "*.MSU" file & extract all the files within it.
2. Using "*.CAB" file against DISM command for installation.

Steps
1. I have a .Net Patch on my desktop. To start with the installation, I will first navigate to my patch location using CD command. ( In this example, it's under desktop )


2. Once done, Expand the "*.MSU" file using below command.
Syntax - Expand -f:* "MSUFile" "Pathwhere you want to extract.

In this case, i have created a folder name "ExtractedCAB" & i will be extracting all the files inside this folder.


3. We will now navigate inside the "ExtractedCAB" using CD command again & use the main CAB file against DISM command to deploy the patch.

Command - Dism.exe / Online /Add-Package /PackagePath: "CABfilelocation"


4. Once done, it will ask for restart, Press Y & post reboot verify Patch installation status either using Control panel or through cmdlets such as Get-hotfix.


Windows Admin Center - Part 2 || Configuring WAC, Adding & Managing Servers

Adding Remote servers onto Windows Admin Center

1. Login to Windows Admin Center --> Click Add --> Select Servers


2. We can now add server one by one or we can have a file containing list of servers and we can then directly import it or we can use Active Directory Search option as well to add.


For now, I have used Active Directory & specified "*" to list all the servers. I can then select the servers & Click Add.

For this demo, I have selected DC4 & MMS2.


Output


Managing Servers using Windows Admin Center

Once added, we can click on the server to connect from Windows Admin Center or else we can select & choose connect.
Note - This would directly connect us to MMS2 using an account from which you are currently logged in to Windows Admin Center.


Incase we need to login using different credentials, we can select the server --> Click Manage as & Enter different set of user ID & password to connect.


Once connected, we can explorer different services / utilities / features, WAC provides.

Example of few -
1. Overview : From here, we can restart, shutdown, rename or unjoin or join the machine to the domain.
We will be able to see live usage / metrics of different resources as well.


2. Under Files & Filesharing, we can see the Disk along with shared folder on the server if any.

3. From Install apps, we can easily see what's installed on the system. From here, we can even uninstall/remove the application as well.


4. Under Local users & groups - We can check local user & group accounts & can manage their membership too.


WAC is a great web based tool & there are lot of things that can be done using WAC.
 

Windows Admin Center - Part 1 Download & Installation

Windows Admin Center - It’s a web based tool using which we can do Remote Management of Workstations/ Servers.

Downloading from Eval Center

Link - https://www.microsoft.com/en-us/evalcenter


Installation

Run the Setup file --> Accept default values --> Windows Admin Center by default uses port 443.

If required we can use any other port from Empheral ports list range but make sure, we have Inbound allowed rule for that port.

Checkout my article on Ports in Windows "https://practicaladmin.blogspot.com/2023/01/logical-ports-in-windows.html"


Verifying if 443 is opened or not.

I have used Port query to check, but it can also be cross check either using Telnet or netstat command.

Listening means port is open.


Accessing Windows Admin Center Console

From any browser, type https://servernamefqdn:portusedforwindowsadmincenter, in mycase it would be https://mms1.mari.com:443

MMS1 - Server hosting Windows Admin Center

Mari.com - Domain Name

443 - Port used in Windows Admin center.


.Net 3.5 Installation Error. Source File not found


While installing .Net 3.5 from Server manager we might end up with below error -


Quick Fix - 
1. Mount Current Operating System ISO on the VM.
2. Navigate to sxs folder under Sources\sxs. Once done, copy the path.


3. Proceed with installing .Net 3.5 again from Server manager.


4. Before clicking on Install, we need to Specify an alternate source path. This is because earlier while installing .Net, source files were not found.


5. Click on alternate source path & paste the path noted in Step 2. Once done click OK and Proceed with Installing.


Installation in Progress & it would be completed successfully this time.


Finish..

Logical Ports in Windows

1. Ports are logical connections which help in identifying which service or program on a server would be used.

2. Ports are always associated with an IP address.
For Ex - Let's consider we open google by typing www.google.com in the URL of a browser. Below are the things happens in the background - 

Name Resolution using DNS - This is to make sure FQDN's are converted into IP address which can then be processed by the computers.

Once name resolution is done, Port 80 for http or Port 443 for https will be appended with the URL IP.
Lets consider  www.google.com resolve to 142.250.194.228 & https is used in the URL, hence we will get something like - 142.250.194.228 : 443

Now here, IP address (142.250.194.228) would be helping in identifying the location/ country where the server is hosted. Once the server is located, then port number (443) would be used to determine https service from the server would be used.

3. There are three types/categories of Ports-

Well Known Ports  : Range [0-1023] - Mostly used by well known global services such as FTP,DNS,DHCP, HTTP, HTTPs and many more.

User or Registered Ports - [1024 - 49151] Companies/developer can use this to register their product / service. 

Empheral Ports - Range [49152 - 65535 ] These are used for creating outgoing connections from the server. These are assigned by the Operating system dynamically. 


Below are some common ports used day to day -


Finish..

Reliability Monitor

 A very simple tool that can be used to monitor System ( Software and hardware ) issues that occurred during a time interval.
It assigns a number/rating called "Stability Index" that shows server reliability.


Practical Usage - 
I used this tool a lot during troubleshooting Windows Servers OS. Assume there is an issue reported on xx day, so normally an admin will go to Event viewer to check all the logs during the time issue was reported to find the root cause, but we can make use of Reliability monitor as well to quickly have a glance on what happened prior or on the day issue was reported. This sometimes do save lots of time.


Using Reliability Monitor
Click Windows Icon --> Search with something like "Reliability" --> Click on View Reliability history


We will see something like below. Simply click on the date & view information.

Ex- On 28th Dec 2022, we can easily see there is a critical alert which states windows was not properly shutdown & along with that an informational event which states an application named "putty " was removed from the system.


We can then click on Technical detail to get some more information on the event / alert.


Finish..

Resetting Windows Local Admin Password Using Utilman.exe Utility

Requirements
ISO of Windows Setup. Prefer same OS ISO if possible.


Steps
1. We will first mount the ISO to the Physical / Virtual Machine & boot the VM from it. 

Mounting ISO


Open Boot Menu by Pressing F10,F11 ( Depends on the machine you are using).
Select CD ROM Drive & machine will start loading the Setup.


Press Shift + F10  when you see below screen. This will open command prompt.


We need to edit some files in System32 under Windows folder, so first step should be to detect the  drive where OS is installed.

Use Diskpart & then list volume. This will list all the Volumes currently present on the System.

Note C volume is of 350 MB, so OS can't be present on it. 


Let's traverse to D drive to see what files & folders are present on it. To do this, we first need to exit Diskpart.
Switching to D Volume by typing D:\

To view the content of D volume type dir.
Folders such as Windows, Users , Programs files etc clearly indicates D volume is OS drive.


We will first traverse to System32 folder using below command.

Cd .\Windows\System32

We will then rename utilman.exe to some other name. Here I have renamed Utilman.exe to Utilman.exe.Old


Once Utilman.exe is renamed, we will then copy cmd.exe Utilman.exe


We will then exit the setup and continue to boot the VM normally. Make sure you are not booting the System from CD drive.

Once Welcome screen comes, we will click on below highlighted Icon to trigger Utilman.exe. ( Note - Since we have copy cmd.exe as utilman.exe, hence once we click on the Icon, it will open command prompt).


Type net user command to view all the local account configured on the VM.
Below screenshot show Administrator as the Only Local account & we will be resetting password for it.

To reset type net user "Account Name" * & hit enter. It will then ask us for new password. Proceed with typing the new password & confirm the same. Once done hit enter & the password will be set.

Note - Password typed while resetting won't be visible, so make sure password matches while resetting.


We can then login to the machine & verify the same.