Few of the articles are posted as Images, Please use Laptop / Computers to go through the articles for best experience. For phone users, switch to Web Version

Please Share with your colleagues if you found these blogs informative. Happy Learning :-)

Disk Modes - Dependent Vs Independent

 We have two type of disk modes - Dependent & Independent modes.

Further independent disk modes has two flavors which are Independent Persistent & Independent Non Persistent modes.


Difference between them comes into the picture when we talk about Snapshot.

Dependent Disk - By default every newly created Hard drive/disk is Dependent disk. So assume if you have a VM which is having dependent disk then after taking snapshot, you will see two .VMDK's one for the base / parent disk & other would be a delta disk.

This means dependent disk are considered in Snapshots. Below highlighted .vmdk is a delta disk created after snapshot. All the changes would be written first to this vmdk & once we decide to delete the snapshot, then all the things from this vmdk will be committed to Parent disk (Non highlighted VMDK)


Independent Disk - Whether it's Persistent or Non Persistent, these type of disk are not considered in Snapshots.

In Independent Persistent mode, once you do any changes on this disk, then it would be permanently written to that disk, so snapshot here doesn't make any sense & that why even if you take a snapshot for a VM, then you won't be seeing snapshot delta disk for the disk which is independent persistent type.

Ex - I have created a disk of 10GIG which is of Independent Persistent mode, and for testing purpose I have taken a snapshot.


Datastore view post adding 10 GIG disk.


Taking Snapshot 


So if we explore the files inside the VM folder in datastore, then we will see only one delta disk which is for first disk as it was Dependent disk. You won't be seeing any delta disk for 2nd disk & the reason being it is independent persistent disk.

In below snap, highlighted disk is a delta disk for disk 1 & no delta disk for disk 2.


Independent Non Persistent - In this mode, once we create a snapshot, then instead of delta disk, some redo logs are created. These are like temporary storage & all the changes that you do on Non Persistent delta disk after taking snapshot will be written to the redo logs.

Since it is temporary, so once you delete the snapshot or even shutdown the VM, all the written changes from the redo logs will be gone.

Ex - I have added a New Disk of 5GIG as an Independent Non Persistent mode & then took a snapshot.


Datastore view post creating Non Persistent disk - 

Uploading: 54737 of 54737 bytes uploaded.
Taking Snapshot


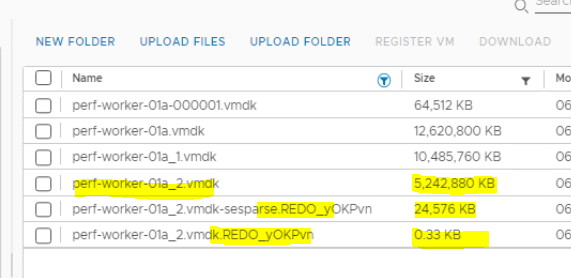
Exploring the files inside VM folder, we will be seeing a new Delta disk on the second row created & this is for first disk as it was Dependent mode, whereas we won't see any delta disk for second disk as it was Independent Persistent mode & finally for third disk we don't see any delta disk created but we do see redo logs created on last two rows & this is primarily because the disk mode is Independent Non Persistent.


Finish ..


Fixing Remove Permission Failed Error from Esxi

I mistakenly added a Group named  "Infra VMware Team" in Permissions tab on an Esxi directly.


When trying to  remove it, getting below error - 


Fix - 
This is due to a bug which prevents removing explicit Users or Groups added to Esx Permissions. We can make use of PowerCLi to fix this.


1. We will connect to our Vcenter using PowerCLi, provide correct User ID & Password.


2. Once connected, we can view all the Esx in the Vcenter by typing "Get-VMHost" cmdlet.


3.  Viewing all the permission on esx-02a.corp.local by typing below command - 

Get-VIPermission -Entity Esxhostname | Format-Table  - Autosize


4. We can also use Principal switch as show below to check permission of a specific user or a group.


5.  To remove permission, type below command - 

Get-VIPermission -Entity Esxhost -Principal 'domain\userorgroup'  | Remove-VIPermission -confirm:$false


& we are done. We can cross check it through GUI or through CLI as well. (Repeat command mentioned in step 3)


Finish

Difference in Template & Cloning


People often get confuse in Templates & Cloning Concept. Let's understand the concept using a Scenario - 

Consider today is 1st Jan 2022, and you have deployed a VM named "VM1", configured various settings, Install required basic applications, Patching etc. Now the management has asked you to create 10 more identical VM's ( meaning same configuration , Applications, Patching etc). It would take so much time if you create & configure VM one by one, also there might be good chances of human errors as well.

In order to overcome this, we have two Concepts "Templates" & "Cloning". Both these concept serve similar purpose and that is creating VM's from existing Setup/VM. This saves our time & reduces chances of human errors.

Since both serve same purpose, then why do we have two Concepts ? Why not only one ?

Answer to this is the way these are used & when they are used.

To understand Template, Suppose the VM that we created & configure on Jan1 "VM1" is converted to a state where it can't be powered on. Now that state will act as a template & we can use it to create  new VM's.
So if I have converted VM1 to a template & use it to create new VM's  then no matter when you create New VM's, all will contain consistent settings & configurations.

Cloning - Here you are creating a new VM from a Live VM. So if you create another VM from VM1 on Jan1 itself, then that would ideally contain all the same configuration & settings ( Considering you haven't made any changes to VM1), but let's assume you created another VM from VM1 after 2 months, then the New VM might contain some extra/different settings from other VM's cloned from VM1 & this is simply because of changes made on VM1 in two months.

In Short, Template ensures consistent state & settings on all new VM's deployed from it whereas Cloning ensures identical duplicate copy of an existing/master VM's.


Apart from this, there are few more differences in both these concept's - 

1. You can't create a Template of a VM when it's powered on. You need to Powered off the VM first, whereas in cloning you can create a New VM from a Live running VM.

2. If required any editing on the template, you first need to convert the template back to a VM, do the changes & then convert it back to the template. In Cloning, since the VM is live, you can do the changes on the Live VM & then cloned a new VM out of the existing /parent VM.

Note - Administrators needs to be careful while Cloning a VM because there are good chances of IP conflict when they powered on the cloned VM & this is primarily because you master VM is also online & having same IP configuration.
To avoid, Administrators first uncheck NIC for the Cloned VM, power it on, login via Console,  do the IP, hostname, SID changes & then enable NIC.
 

Powershell Script - Creating New AD Groups

#Author - Abhishek Bansal 

$grp = Get-Content ./Input.txt
foreach($row in $grp){
$row = $row.trim()

    try
    {
    New-ADGroup -Name $row -GroupScope Global -GroupCategory Security -Path "OU=Groups,OU=Production,DC=Mari,DC=com" -PassThru | Select Name,@{n=("Status");e={("Created under")}},DistinguishedName | Export-Csv ./Output.csv -Append -NoTypeInformation
    }

catch
    {
       $row | Select-Object -Property @{n=("Name");e={($row)}},@{n=("Status");e={("already exist under ")}},@{n="DistinguishedName";e={(Get-ADGroup -Identity $row | Select DistinguishedName)}} | Export-Csv ./Output.csv -Append -NoTypeInformation
        }

}


Read Me !!

1. I am using a relative path to take input & export the output. So please make sure you Create a folder with any name of your liking, then copy the above script & save it with .ps1 extension into the folder.

2. Once copied, also create a text file name Input.txt ( This will be used to take input into our Script & it should contain AD Group names which we need to create.


3. Once done, run the script. It will create the new AD Group under OU mentioned in the script.


Please note- Some Arguments are static in the Script, they will definitely vary in your workspace, so  edit them as per your structure.

Arguments required editing - Group Scope / Category [ If you want some other Scope & Category ], Path - [ OU  Location where you want to create the Groups]

4. Also, If a Group is already created, then this script will through an error & for that we have mentioned Catch block. This way you can see which all Groups are created & which are already present, where it is present etc.


Finish

Setting up Additional Domain Controller using IFM ( Install From Media)


Setting up a Domain Controller using IFM ( Install From Media)

There should be a good bandwidth when we are setting up an additional Domain Controller ( Default 500 Kbps). Now Imagine you are planning to add an additional DC on a remote site but the bandwidth is quite low (below 500Kbps), as a result you will not be able to add additional DC.

One solution that was used before 2008 was to take a System State backup & then transfer the media to Remote site via some external media & then using it. But taking System State backup takes long time & also it's not secure / preferable to do this way. Instead we can use Install from Media Option. 
From 2008 Onwards Microsoft introduced IFM (Install From Media) using which if we still have low bandwidth, then also we can add additional Domain Controller. In Install from Media, we basically copy NTDS.DIT ( AD Physical Database file ) & some registry settings which are required to Promote a Domain Controller.

Note - You can join Computers to domain Offline but Domain Controller can't be promoted in Offline Mode, There needs to be connectivity with a Working Writable DC for promoting a new DC. 


Steps
1. Login to any Writeable Domain Controller, Open CMD as an Administrator.
2. Follow below commands - 
ntdsutil 
activate instance ndts
ifm
create full C:IFM

Once done, it will automatically copy the AD Database & registry setting into IFM folder under C:\


3. At this Point, IFM Media is ready, now we simply need to install ADDS role onto the Remote site server which we are planning to promote as a Domain Controller.

Note - Kindly make sure, prerequisite for Promoting a Domain Controller is met. Things like IP Configuration, Primary / Secondary DNS should be properly configured etc.
Ex - DC1 is in Site 1, I am adding DC2 as additional Domain Controller in Site 2. 
Installing ADDS using Powershell, you can also do the installation via GUI.
Below is the command - 
Install-WindowsFeature -Name AD-Domain-Services -IncludeAllSubFeature -IncludeManagementTools


Post installation of ADDS role, Click on Notification Tab & Start Promoting it to a Domain Controller.


Since, we are adding additional Domain Controller, hence we will select Add a domain controller to an existing domain, Cross check the domain name & make sure user with sufficient access would be listed.
(Since i am logged in as Administrator which is Part of Domain Admins, hence it's auto populated in below field.)


Click Next & Select Site 2, I will be setting up this DC as a Global Catalog Server & hence check marking on it, providing the DSRM password & clicking on Next.

DSRM - Directory Service Restore Mode, It's not a Administrator or any Domain ID credentials. It's a Local Password for this DC only, You can have different DSRM password for different DC's. This password is primarily  useful in activities when we are taking our DC into Restore Mode. Once such example could be taking the DC into Safe mode for Restoration from last backup.


Now here you need to do some changes. Instead of Selecting Replicate from Option, we will check mark on Install from Media Option & browse to the IFM folder which we created from another writable domain Controller( DC1).
I have copied it in DC2 Desktop, so will be selecting accordingly.


Keep the default path for storing NTDS, Log file & Sysvol folder & click Next


Review all the options selected & click Next, It will run a Prerequisite Check, let it complete. Once done Click on Install.


Now the Promotion process will start. Once complete, your system will be automatically restarted.


Post reboot, you will have additional DC in the Remote Site. You can cross check in AD Sites & Services, under Site 2 you will see DC2 as new entry, or in AD Users Computer under Domain Controllers OU & many other places also.


Lingering Objects in Active Directory

 What are Lingering Objects ?

First we need to know What Tombstone Object & Tombstone Lifetime are, before we understand Lingering Objects.


Tombstone Object 

Whenever an object in AD is deleted, it is not permanently removed from AD, An Object first becomes / converted to a special object called "Tombstone Object" & they reside in AD in a special container called Deleted Objects.

Like all the objects in AD replicates, Tombstone Objects also replicates & this is to make sure other Domain Controllers in the environment also mark that object as Deleted in their database copy.


Tombstone Lifetime 

Now the questions is how long these Tombstone objects resides in AD ? 

Tombstone object will be preserved in AD for a certain time & that time period is called "Tombstone lifetime". Once the tombstone lifetime expires, the tombstone object will be discarded / deleted permanently from AD.


To check Tombstone Lifetime - 

Login to any Domain Controller in the domain --> Run --> ADSIEDIT.MSC --> Connect --> Select  Configuration Naming Context --> Navigate to CN = Services --> CN = Windows NT --> CN = Directory Service ( Right Click ) --> Properties to see the Tombstone Lifetime.


From above snap, it's clear that Tombstone lifetime is 180 days. If required, we can edit it also. The value will then be replicated to all the DC's in the domain.

So if we delete an object today, then it will be there in AD for next 180 days before it is permanently purged from Active Directory Database.


Lingering Object

Now to understand Lingering Object, consider below example - 

Consider you have total 5 Domain Controllers [ DC1 , DC2 .... DC5 ] in your environment, today is 1st Jan . Tombstone lifetime is set to 10 Days in the domain.

Now further assume, DC1 goes down due to some Operating System issue on 2nd Jan. Other 4 Dc's are working fine. You do normal operation stuff on them ( Can be creating an object  ,deleting ,renaming etc). Suppose you have deleted 4 AD groups & 2 user account on 3rd Jan. Your DC1 is still down & as we know AD is multi meter database model, so all these deletion changes will also be replicated to other working DC.

Since the Tombstone lifetime is set to 10 days, so the objects deleted on 3rd Jan will be preserved in AD till 13th Jan ( Total 10 days ), now further assume you mange to bring back DC1 after 13th Jan. Now all 5 Dc's are operational but since the tombstone lifetime for objects deleted on 3rd Jan is already expired,, so DC2,DC3,DC4 and DC5 don't have that object in their database copy whereas DC1 will have those deleted object in it's database copy ( Simply because those objects were present before DC1 went down).

These unwanted objects will linger in the environment & hence these objects are known as "Lingering Objects".


Powershell Script - Remove Computer Objects from Active Directory

#Created By - Abhishek Bansal

<#Read Me !! 
1. Script Usage - Deleting Computer Objects mentioned in Input.txt from AD.
2. Incase of Access Denied, run ISE as Administrator & make sure account used should have sufficient rights to delete a Computer Object.

For using it, directly copy the entire code, save it in .ps1 extension and have a Input.txt file on the same location. #>


$srv = Get-Content -Path .\Input.txt
$line = 0
$linecount = $srv.Count
$percentagecomplete= 0

foreach($row in $srv)
{
$error.Clear()
$row = $row.trim()
$line++
$percentagecomplete = $line / $linecount * 100

Write-Progress -Activity "Checking Status.." -PercentComplete $percentagecomplete -Status "$line out of $linecount"


    try{
    Remove-ADComputer -Identity $row -Confirm:$false
    $row | Select-Object -Property @{n="Computer Name";e={$row}},@{n="Status";e={("Deleted Succesfully")}} | Export-csv ./Output.csv -NoTypeInformation -Append
    }
       catch [Microsoft.ActiveDirectory.Management.ADIdentityNotFoundException]
       
       {
    $row | Select-Object -Property @{n="Computer Name";e={$row}},@{n="Status";e={$error.exception.Message}}| Export-csv ./Output.csv -NoTypeInformation -Append
    }

}